
使用 OpenCV 解数独
寝室里一哥们申请出国,发了 N 封信,终于有人理他了,人家让他把做过的东西给他看看,他傻眼了,因为他的简历都是吹出来的!于是他找我和他一起干,做一个能解数独的安卓应用。他主要负责安卓应用开发,我负责 OpenCV 识别。其实我对 OpenCV 也只是知道一些皮毛,所以只好一边学一边做了。
首先,需要找一张数独的图,直接用了《编程之美》上 P.99 页的几张图。然后依次解决以下问题:
- 怎么在拍到的图中找到感兴趣的数独的区域
- 怎么从找到的区域中分离出每个数字,并知道每个数字的位置
- 怎么识别出不同的数字
一、找到数独所在区域
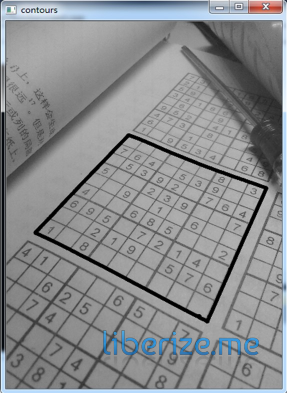
关于这个问题,想了几种方案,比如直线检测、矩形检测、连通域检测等等,最后用了最简单粗暴的方式:直接找面积最大的轮廓。
// 读取图像
Mat img, src;
src = imread(file, CV_LOAD_IMAGE_GRAYSCALE);
src.copyTo(img);

// 自适应二值化,中值滤波
adaptiveThreshold(img, img, 255, CV_ADAPTIVE_THRESH_MEAN_C, CV_THRESH_BINARY_INV, 25, 10);
medianBlur(img, img, 5);

// 遍历轮廓,找到面积最大的
vector< vector<Point> > contours;
findContours(img, contours, CV_RETR_EXTERNAL, CV_CHAIN_APPROX_SIMPLE);
double area, maxArea = 100;
int maxIdx;
for(int i = 0; i != contours.size(); ++i) {
    area = fabs(contourArea(contours[i]));
    if(area > maxArea)
    {
        maxIdx = i;
        maxArea = area;
    }
}

// 对最大的轮廓做多边形近似,并判断是否符合要求
vector<Point> poly;
approxPolyDP(contours[maxIdx], poly, arcLength(contours[maxIdx], true) * 0.02, true);
if(poly.size() != 4 || fabs(contourArea(poly)) < 5000)
    return false;
附图一张:
二、从数独区域分离出数字
考虑到得到的区域可能是不规则的四边形,先通过透视变换变成正方形。
// 将数独区域通过透视变换转为正方形
Mat dst(size, size, src.type());    // size 为目标边长,此处定为 303

// 首先确定轮廓中的四个点的对应位置
// 横纵坐标之和最小的认为是左上角的点,横纵坐标之差最大的认为是右上角的点
int sum, minSum = INT_MAX, ptTopLeft, dif, maxDif = INT_MIN, ptTopRight;
for(int i = 0; i < 4; i++) {
    sum = poly[i].x + poly[i].y;
    dif = poly[i].x - poly[i].y;
    if(sum < minSum) {
        minSum = sum;
        ptTopLeft = i;
    }
    if(dif > maxDif) {
        maxDif = dif;
        ptTopRight = i;
    }
}
if(ptTopLeft != (ptTopRight+1)%4 && ptTopRight != (ptTopLeft+1)%4)
    return false;

// 确定变换的四个源点和四个目标点
Point2f srcPoints[4] = {
    Point2f(poly[ptTopLeft].x, poly[ptTopLeft].y),
    Point2f(poly[ptTopRight].x, poly[ptTopRight].y),
    Point2f(poly[(ptTopRight+2)%4].x, poly[(ptTopRight+2)%4].y),
    Point2f(poly[(ptTopLeft+2)%4].x, poly[(ptTopLeft+2)%4].y)
},
dstPoints[4] = {
    Point2f(0, 0),
    Point2f(dst.cols-1, 0),
    Point2f(0, dst.rows-1),
    Point2f(dst.cols-1, dst.rows-1)
};

// 进行透视变换,并做边界补偿
Mat wrapMatrix = getPerspectiveTransform(srcPoints, dstPoints);
warpPerspective(src, dst, wrapMatrix, dst.size());
dst = dst(Rect(border, border, dst.cols-border*2, dst.rows-border*2));
附图一张:
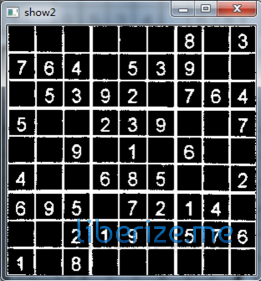
完成以后,按行、列等间隔划分成 9x9 的小块,对每个小块切掉边界几个像素,然后去除面积小的区域,得到的就是背景全黑、只有数字的图像了。接着再找到包围数字的最小正方形,就可以做数字识别了。
adaptiveThreshold(dst, dst, 255, CV_ADAPTIVE_THRESH_MEAN_C, CV_THRESH_BINARY_INV, 25, 10);

int step = size/9;      // step 为每个小方格的边长
Mat cell, num;

int result[81];         // result 用来存储识别结果
memset(result, 0, sizeof(result));

// 分割成 9x9 的图像分别进行处理
for(int i = 0; i < 9; i++) {
    for(int j = 0; j < 9; j++) {
        cell = dst(Rect(j*step+cut, i*step+cut, step-cut*2, step-cut*2));

        // 去除面积小的区域
        Mat img;
        cell.copyTo(img);
        vector<vector<Point>> contours;
        findContours(img, contours, CV_RETR_LIST, CV_CHAIN_APPROX_SIMPLE);

        Mat mask = Mat::zeros(cell.size(), cell.type());
        for(int i = 0; i != contours.size(); ++i) {
            if(fabs(contourArea(contours[i])) > areaThresh)
                drawContours(mask, contours, i, Scalar(255), CV_FILLED);
        }
        for(int i = 0; i < cell.rows; i++) {
            for(int j = 0; j < cell.cols; j++) {
                if(mask.at<uchar>(i, j) == 0) {
                    cell.at<uchar>(i, j) = 0;
                }
            }
        }
        if(sum(cell)[0] == 0)
            continue;

        // 获得感兴趣区域
        int left, right, top, bottom;
        left = cell.cols;
        right = 0;
        top = cell.rows;
        bottom = 0;

        for(int i = 0; i < cell.rows; i++) {
            for(int j = 0; j < cell.cols; j++) {
                if(cell.at<uchar>(i, j) > 0) {
                    if(j < left) left = j;
                    if(j > right) right = j;
                    if(i < top) top = i;
                    if(i > bottom) bottom = i;
                }
            }
        }
        int width = right - left;
        int height = bottom - top;
        int len = (width < height) ? height : width;
        num = Mat::zeros(len, len, CV_8UC1);

        Rect dstRect((len - width)/2, (len - height)/2, width, height);
        Rect srcRect(left, top, width, height);
        Mat dstROI = num(dstRect);
        Mat srcROI = cell(srcRect);
        srcROI.copyTo(dstROI);

        // 识别数字
        result[i*9+j] = recNum(num);
    }
    // 打印识别结果
    for(int k = 0; k < 9; k++) {
        cout << result[i*9+k] << "\t";
    }
    cout << endl;
}
继续上图:
三、识别不同数字
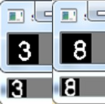
此处使用支持向量机(SVM)来做数字识别。将上一步得到的 ROI 缩放成 sampleSize*sampleSize 大小,然后转成向量,就可以根据实现训练好的数据进行识别了。
至于训练过程,其实也不难,自己做 1000 多个样本,然后人工识别了一下,写一个训练的程序,每次读入样本和识别结果进行训练就可以了。
CvSVM svm = CvSVM();
svm.load( "../SVM_DATA.xml" );

int recNum(const Mat &num)
{
    Mat temp = Mat::zeros(sampleSize, sampleSize, CV_8UC1);
    Mat data = Mat::zeros(1, sampleSize*sampleSize, CV_32FC1);

    // 统一大小
    resize(num, temp, temp.size());

    // 转成向量
    for(int i = 0; i < sampleSize; i++) {
        for(int j = 0; j < sampleSize; j++) {
            data.at<float>(0, i*sampleSize+j) = temp.at<uchar>(i, j);
        }
    }

    // 归一化、预测
    normalize(data, data);
    return char(svm.predict(data)) - '0';
}
完整代码见 Gist:https://gist.github.com/liberize/7526824。本文中为了查看方便,修改了代码结构,但思路是一样的。训练的代码见 Gist:https://gist.github.com/liberize/7526893。其中样本是按 0.png, 1.png ... 进行编号的存放在 sample 目录下,每个样本对应的标签是按样本编号 标签格式按行存放在 label.txt 文件中。